Wednesday, January 30, 2019

How to Claim Social Security Benefits in Thailand for Foreigner

Many foreign nationals who are working here Thailand are contributing their Social Security Insurance monthly automatically deducted in their salary.

Thai Social Security Benefits 


The benefits include sickness benefit (free medical care at any registered hospital), maternity benefits, invalidity (50% of wages for the whole life in case of permanent disability), death benefits (funeral grant of 40,000 Baht; grant fund for survivors), child allowance (of 350 Baht per child per month, up to 2 children), old age pension (the retirement age in Thailand is 55 years), and unemployment benefits (30% or 50% of wages up to 90 days or 180 days, depending on the cause of unemployment).

Social Security Unemployment Financial Benefit in Thailand


As experienced by my cousin he did not pay for it monthly even though his co-teacher are convincing and insisting him to do so. Well, his reason was that he is healthy and does not need for the main purpose of health assistance on it. The school his working at did not also force them to apply for it, they let their employee decide freely on their own regarding this matter. 

My cousin works as a Teacher for 2 years consecutively at the same school, at his 3rd year - a colleague mentioned that having the Social Security card, does not only cover health assistance but also provide financial aide encase of unemployment. Due to this information he applied for Social Security Insurance and paid 750 THB monthly for it in 1 whole year. 

A year after he completed his contract and moved to a different city unemployed, he received financial benefit from his Social Security Insurance Claim. Below is how my cousin experience on how he received his Social Security Benefits.

NOTE: If you are planning to apply for Thai Social Security unemployment benefit do inform your supervisors ahead of time so they can prepare for the necessary documents needed.

Registration for Unemployment Benefit Claim for Foreigner


You must be registered as insured at any Employment Office, within 30 days after leaving the job.

In the event of termination of employment will receive severance pay of 50% for 180 days

The resignation will receive compensation of 30% for 90 days.

According to the Social Security base salary that does not exceed 15,000 baht.

You must bring your Social Security cards and appointment note when you report to the official.

You must report to the official on the date as specified in the appointment note otherwise, you may not obtain the compensation of that period. You could report to the official at any Employment Office facilities in advance but it could not exceed 7 days before the appointment date.

Required Documents for Unemployment Benefit Claim for Foreigner


These are the 3 documents you need. 


Once you started the process for your financial claim, you won't receive the amount right away. The amount you will be receiving will be divided into 3 consecutive months. So, if your contract end on April 28, you should submit your social security financial claim documents within April or May (within 30 days time frame after you resign/end of contract). 

The total amount you'll receive will be divided as example below:
  • 25% First appointment on May 28
  • 25% Second appointment on June 28
  • 50% Third appointment July 28 


On May 28, June 28 and July 28 you need to physically appear in the Labor Office (or any nearest Labor Office near you) and submit your appointment document (Document 3 above) with your Social Security ID.

Once you went to the Labor Office on May 28, the amount won't be given to you in hand at that exact day. It will take a week for them to process the approval release of the money, before it reaches to your bank account. 

My cousin said that the lady who entertained him at Bangkok Labor Office was so approachable and kind, that everything went all smooth and can also speak English well. At his second month June 28 appointment he cannot be physically present due to some important matter and the lady understood and advised for adjustment on appointment time where he can come at the Office.

Hope this helps!

And we would greatly be glad if you could also share your social security claim experience with us.


Wednesday, January 2, 2019

How To Create Free WordPress Website and Blog - Step by Step 2019


As I have noticed, WordPress have been improving a lot. The look and feel in Wordpress.com and WordPress.org now has much distinction. Like they are now having they own identity. Though yeah there are a lots of comparison to both.

 Wordpress.com 2019 has a different user interface at admin dashboard compared in the past which amazes me. 

So let's jump right to the point why we are here.

To Create a Free WordPress Website Blog Step by Step 2019

All you need to do is visit wordpress.com and start. These are the steps we will encounter:
  1.  Sign up for your Account
  2.  Create your website (Niche)
  3.  Validate email address
  4.  Choose website address
  5.  Select a Plan - Free

Let's get started!

1. First sign up for an account using a valid email address. 


2. Choose your niche. 


For me, I have in mind about food. Which makes me feel kinda hungry at the moment. 

(And if you want to create another website, let say you want to make another website about sports, then start again here at this step #2  or click this link )


3. Validate your email address. 


Visit you email inbox and click confirm now to continue.


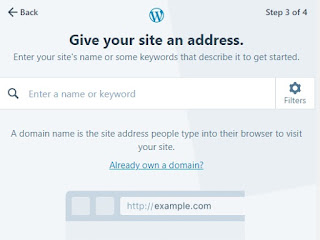
4. Type your website address. 


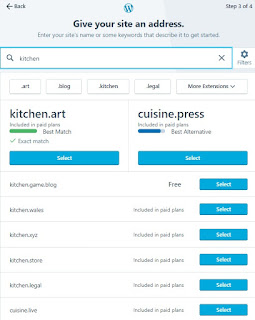
In my blog site since I choose the topic about cooking food.  You can type in a keyword for example "food", "cooking", "recipe". And I had in mind for my website address to be "my kitchen skills" at first, then I head on and try if the keyword is available. 

  
As you can see my keyword results below, there are lots of options to choose. But since I am after for a FREE website so my only option is the the available website address that is FREE. In the past, for WordPress.com if my keyword is available it would have been like this "kitchenskill.wordpress.com" or "mykitchen.wordpress.com". But these two website address are not in the sub-domain now. If you wanted it to be under wordpress.com you gotta pay for it now, will in the past that was the FREE option we had. And since wordpress.com has offered these changes you can see below for website addresses below  then will just choose the FREE PLAN since plan not to spend a cent.So now the final judgement is here, my website address is mykitchen.video.blog

5. Choose a plan. 


If you want it free then you click on "Start with free" then continue.


We are now at wordpress.com/checklist , whenever you want to go check what stage you are at, do visit the checklist link as your guide.


Writing you website description. It should be powerful sentence that describes what your website is about and to be it an SEO friendly it should contain your keywords in there.


Nest is to upload your favicon, it is the picture/icon you can see at your address bar beside the address name. For me since my website address and website name is " My Kitchen", I got it's initial and head to paint. Yes, my simple favicon was quickly made from paint and you can customize your own to. You can choose any picture you like that would describe your website it serves as your website's LOGO.


Adding content in your contact page. The contact form was already there in when my website was created, contact page exist - so you can add in your message below.


And here I have created my first post. 


My FREE WordPress.com website is done. You can visit my FREE WordPress.com website here mykitchen.video.blog

We can add in more post and page to add content in our site.

You are free to explore WordPress dashboard. Go to themes and experiment what your website you want to look like. For free plan we just have limited choices of theme, but it's okay for start to explore and FREE is pretty amazing!

How to create multiple WordPress blogs with the same email

First, log in with your WordPress.com account, then follow step 2 above.


Hope this helps.


Tuesday, June 26, 2018

English Alphabet with Lines

Letters of the Alphabet with Guidelines


Alphabet with lines

It is so nostalgic how these English Alphabets was been decorated in our classroom which always reminds me of my primary years. During free time or class time I have seen myself closely staring the Alphabets with guidelines displayed on top of the blackboard. The cursive style of writing, blue - red - blue lines that serves as a guide, my eyes follows the flow of the how the letters should be written within the lines like playing snake game on mobile phone nokia 3310 haha.

The sense of sight. Learning through viewing, memorizing and embedding to the mind. Every classroom has its own 'Letters of the Alphabet with guidelines' displayed on the wall as guidance for kids.

Alphabet with lines


English Alphabet with Lines


Alphabet with lines


Are these Letters of the Alphabets decoration been helpful to you? Students? Teachers?
I would love to check out your English Alphabet decoration at home or at your classroom in the comment section below. 

Thursday, March 30, 2017

Add Multiple Image in Blogger using CSS Code


Adding Multiple Image in Blogger 


Use the code below, replace the "imageURL" with the URL of a photo you've uploaded somewhere on the web (if in blogger open the gallery, right click the image and copy the "image url link").

<img src="imageURL" style="float: left; width: 30%; margin-right: 1%; margin-bottom: 0.5em;">

Repeat this line of code for each image. I repeat in each line of code, you replace "imageURL" with the URL of the photo.

IMPORTANT: For example if you are making 3 images in a row, After your third last image, add the following code:

<p style="clear: both;">


It should look like these below:


Case 1: For three images horizontally

<img src="imageLocation" style="float: left; width: 30%; margin-right: 1%; margin-bottom: 0.5em;">
<p style="clear: both;">

I added border="1" into the code to make each image much more visible. Adding a border is optional.

letter a letter e Letter i


Case 2: For four images horizontally:

<img src="imageLocation" style="float: left; width: 20%; margin-right: 1%; margin-bottom: 0.5em;">
<p style="clear: both;">

letter B


These could be your guide in adding your images width: 


  • Three images horizontally: 30% + 1% times 3 = 93%.
  • Four images horizontally: 23% + 1% times 4 = 96%.
  • Five images horizontally: 19% + 0.5% times 5 = 97.5%


In my example above I use the width: 20% for case 2 to fit the images on my body, you can also adjust the width's of your images as you like but try to check them first in your front-end.

Great Thanks to this source.


Wednesday, March 29, 2017

Alphabet Flash Cards - Kindergarten Printables

PNG Alphabet Flash Cards


With these free printable alphabet flash cards you can use them to decorate your kids room, your classroom, for games and play, for learning and as a guide for proper writing.

You can customize them as you like. I purposely colored them with different font colors so that kids would easily identify the differences. There are 26 letters in the alphabet, 5 of them are vowels and 21 are the consonants.

kindergarten alphabet

Here is a snapshot of my alphabet. (Please excuse the mess). I printed them landscape format using white paper, stick them all 26 letters together, using a future board to make it thick so it could be hang. Then use plastic cover for protection so that it would last long. This long 26 connected letter board can be easily move because its detachable, I use only a pin to hold it up. These pins are attached in the black sound box as you can see in the image.


LETTERS ONLY

These letters are in PNG file so you can use any colored paper as you like for your classroom design that suits you. You can even use for example "yellow paper" for printing vowel letters and "pink paper" for printing consonant letters. To emphasize which is a vowel or a consonant.


Red Letters are VOWELS.

vowel letters

letter a letter e letter i
letter o letter u


Black Letters are CONSONANTS.

consonant letters
consonant letters
consonant letters

Download the PNG ZIP FILE of ALPHABET FLASHCARDS HERE: 

 PNG Alphabet Flashcards
letter b letter c letter d letter f
letter g letter h letter j letter k
letter l letter m letter n letter p
letter q letter r letter s letter t
letter v letter w letter x letter y
letter z
Alphabet for ages 3-up 4-PACKS below @Amazon
If you have any suggestions or requests for a different alphabet designs, do drop it the comments section below.
Enjoy!